Azure Messaging Services Quickstart - Service Bus

Welcome to my blog post on Azure Messaging Services! In these articles, I’ll delve into the intricacies of various messaging solutions offered by Azure, exploring why and when you should use them, and how to make the most out of each service.
Today, we’ll specifically talk about Azure Service Bus.
Why Messaging?
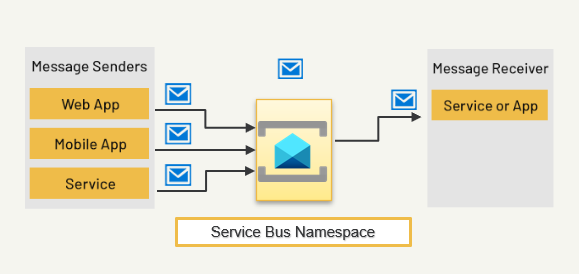
Firstly, it’s essential to address why we need these messaging services. At a basic level, you might not actually need them. If you’re building a small application with a single client, API, and database, messaging might not be necessary. However, messaging becomes invaluable when you have distributed applications, such as microservices or serverless applications, that need to communicate seamlessly. While REST APIs are excellent for retrieving data and sending requests, messaging is the solution for non-blocking, loosely-coupled communication between applications or services.
Understanding Messaging Terminology
Before we delve into specific services, let’s familiarize ourselves with some key messaging terms:
- Message: Essentially an instruction or command sent from one system to another.
- Event: Similar to a message but more about broadcasting that something happened, rather than expecting an action.
- Producer: The sender of messages or events.
- Consumer: The receiver of messages or events.
- Broker: The intermediary service responsible for handling and routing messages or events.
- Event-driven Architecture: A design approach focused on building distributed applications that communicate via events or messages.
Azure Service Bus

Why Use It?
- Offers high reliability and scalability.
- Supports standard AMQP 1.0 protocol.
- Provides advanced features for enterprise messaging scenarios.
When Not to Use It?
- Not suitable for polling or broadcasting.
- Avoid unnecessary costs for high reliability.
- Testing locally might be challenging.
How to Use It?
- Utilize SDKs like .NET, Java, Python, etc.
- Alternatively, interact via AMQP for low-level consumption.
Creating a Service Bus in Azure
Setting up a Service Bus Queue in Azure is a straightforward process. Follow these steps to create your Service Bus Queue using the Azure portal:
Step 1: Sign in to the Azure Portal Navigate to the Azure Portal and sign in with your Azure account credentials.
Step 2: Create a Service Bus Namespace If you haven’t already created a Service Bus namespace, follow these steps:
- Click on the “Create a resource” button (+) in the Azure portal.
- Search for “Service Bus” and select it from the results.
- Click on the “Create” button.
- Fill in the required details for your Service Bus namespace, such as subscription, resource group, namespace name, location, and pricing tier.
- Click on the “Review + create” button and then “Create” to provision the Service Bus namespace.
Step 3: Navigate to Service Bus Namespace Once your Service Bus namespace is created, navigate to it by selecting it from the list of resources in the Azure portal.
Step 4: Create a Queue Within your Service Bus namespace, locate the “Queues” option in the left-hand menu.
- Click on “Queues” to view existing queues or create a new one.
- Click on the “+ Queue” button to create a new queue.
- Enter a unique name for your queue.
- Optionally, configure additional settings such as message time-to-live (TTL), maximum queue size, and duplicate detection.
- Click on the “Create” button to create the queue.
Step 5: Access and Manage Your Queue Once your queue is created, you can start using it to send and receive messages. You can manage your queue settings, monitor queue metrics, and configure access policies as needed.
To get the connection string for your Service Bus Queue, follow these steps:
- Navigate to your Service Bus namespace in the Azure portal. -Under “Settings,” select “Shared access policies.” -Click on the policy that you want to use to access the queue.
- Copy the connection string from the “Primary connection string” or “Secondary connection string” field.
Congratulations! You have successfully created a Service Bus Queue in Azure
Sample code
Here’s the link to the sample .NET code for Service Bus. You can paste the copied connection string on the connectionString field: https://github.com/mindofai/ServiceBusDemo
You should be able to test sending messages using service buses. I sugges you add breakpoints, so you’ll see the message lifecycle on a Service Bus.
Further Exploration
References:
- Azure Service Bus Documentation
- Get Started with Azure Service Bus Queues
- Azure Service Bus Pricing
- Service Bus Explorer Tool (Useful for managing and testing Service Bus resources)
If you have any questions or wish to explore specific topics further, feel free to reach out to me:
- Bryan Anthony Garcia
- @mindofai
- bryananthonygarcia@live.com
Thank you for reading!