
Implementing Localization with Xamarin.Forms using Resx files
Last month, Mobile .NET Developers - Philippines in partnership with DevCon PH and Seer Technologies had a whole day hands-on training session called Xamarin Code Camp for Professionals. In the first half of the event, the crew and I talked about Visual Studio 2017, fundamentals of Xamarin, Microsoft Cognitive Services, MVVM, Localization and Accessibility. Then, right after lunch, we had live coding and mini hackaton about the things we discussed in the in the first half. All in all, it was a great event, everyone looked happy and I really think they learned a lot of things about Xamarin.
I was supposed to talk only about Localization, but we needed to atleast give them knowledge about MVVM, because they’ll be using the design pattern in the live coding. So, yeah, we didn’t have a choice so I gave a brief introduction to MVVM and I just followed the given slides lol. Anyway, I really want to talk about Localization, because I feel like it’s really important to implement it to all applications in the App Store or Play Store, since it’s going to be available globally. Only a few application have been internationalized, but I’m pretty sure that these apps are much easier to use for a lot of people globally and ofcourse, they cater a bigger market.
Internationalization
So, let’s talk about Internationalization. Basically, it is when your app supports more than one language. Just like Pitbull, your app becomes Mr. Worldwide.

Enough with the jokes. In all seriousness, Internationalization is the process of making your code capable of displaying different languages and adapting its display for different locales. This is also called globalization.
B-b-but, why???
You might ask, why is this important? This is the list of the top countries who download apps on Playstore since 2014.

The first country on the list is India, US is close second and Brazil is third. Then fourth and fifth are South Korea and Japan. 4 of the top countries don’t have english as their main language so it’s really a great idea to support their very own. So, in order for your app to cater these top countries, support these countries’ languages.
How exactly are you gonna support these languages?
How are you gonna implement this on your app? That’s what localization is. You can implement it by creating resources for each language and bundling them with the internationalize app. All you have to do is to create a resource file for each languages. These resources have a list of key value pair of words, phrases, or sentences.

For example, you have a resource file for english, and you have key of ThankYouText with a value of “Thank You”. And you also have a resource file for Filipino which also has a ThankYouText key but with a value of “Salamat”. After creating these resources, you can now use it on your app. The app will select its corresponding resource depending on the phones language. If there is no corresponding resource, it will use the default, which is english.
Creating Resx files
In order for us to create a language resource for each language that we want to support, we’ll have to create a Resources folder first (just to organize our resx files) inside the Portable project. Next is to actually create the resource file. You can do this by right-clicking the Resource folder, Add > New File > General. and select Resource file.

Name the resource file AppResource.resx and this will be our default language resource which is english. Once created, you can now add a Name or the key for this translatable string(It must be a valid C# property name - so no spaces or special characters are allowed) and of course the value which is the string that we want to display in our application. It should look like this:

Once done with our default resource file, we can now create resource files for other languages that we want to support. For each language you’re going to support, you will need to add an aditional resource file with the name: “Resource.{culture name}.resx”. You can find a list of culture names here. In my case, I’ll support the Spanish language, so I’ll name it Resource.es.resx. We’ll need to add the same keys that we added in our default resource to make sure our app will have translations for each text. This is how mine looks like:


You can create more if you want, but I’ll only add Spanish.
Using Resx files through Csharp
We can now use our resource files by just calling the AppResource class. As an example, I created a Label control with the text of AppResource.WelcomeText just inside the App constructor.
  public App()
        {
            InitializeComponent();

            MainPage = new ContentPage()
            {
                Content = new Label()
                {
                    Text = AppResource.WelcomeText,
                    HorizontalOptions = LayoutOptions.Center,
                    VerticalOptions = LayoutOptions.Center,
                    TextColor = Color.Red,
                    FontSize = 22
                }
            };
        }
Now, when I run the app, this is how it looks like when my phone’s language settings is English.

But, when I use Spanish as my phone language, this is how it looks like:

Using resource files through C# isn’t as hard as you think it is. We can also use XAML for this, but we’ll have to add a glue in order for our app to inject our values into our controls. We’ll have to use the IMarkupExtension interface. We’ll do it by creating a C# class named TranslateExtension.cs and we’ll implement it by adding this:
using System;
using System.Globalization;
using System.Reflection;
using System.Resources;
using Xamarin.Forms;
using Xamarin.Forms.Xaml;

namespace LocalizationDemo
{
    [ContentProperty("Text")]
    public class TranslateExtension : IMarkupExtension
    {
        const string ResourceId = "LocalizationDemo.Resources.AppResource";
        public string Text { get; set; }

        public object ProvideValue(IServiceProvider serviceProvider)
        {
            if (Text == null)
                return null;
            ResourceManager resourceManager = new ResourceManager(ResourceId, typeof(TranslateExtension).GetTypeInfo().Assembly);

            return resourceManager.GetString(Text, CultureInfo.CurrentCulture);
        }
    }
}
This allows us to look up translated values at runtime using the ResourceManager (this is part of the boilerplate code generated by Visual Studio earlier. You can examine the code by opening the code-behind file of the AppResource.resx file ). The resource manager will select the appropriate resource file, depending on the language used on the device. The text value to be translated will be provided by the XAML view.
Now, I can create a XAML page called MainPage.xaml and use the AppResource. I’ll display a button control with the text of TapThisButtonText. We can now do this in our XAML by just calling the Translate extension thru the local: namespace (it depends on your TranslateExtension’s namespace)
<?xml version="1.0" encoding="utf-8" ?>
<ContentPage xmlns="http://xamarin.com/schemas/2014/forms"
             xmlns:x="http://schemas.microsoft.com/winfx/2009/xaml"
             xmlns:local="clr-namespace:LocalizationDemo"
             x:Class="LocalizationDemo.MainPage">

    <Button Text="{local:Translate TapThisButtonText}"
           VerticalOptions="Center"
           HorizontalOptions="Center" />

</ContentPage>
This will result to a button with a Tap this button text for both english and spanish.


It’s not only about the language
Localization doesn’t only apply with text or labels. It can also be applied with images. As you can see below, these are the stop signs around the globe. Most of them look alike, just the same label. But as you can see japan ruined everything. Not really, but still, it has a different shape.

Another thing the problem with colors In western cultures, red means danger or error. While, in China, it means good news. So, there are alot of things to consider, so let’s start because I don’t even wanna get started with gender.
Localization with images and application name
Although we can do translations for text through Shared code, elements such as images and application names must be done platform-specifically.

Android Project
Images
With Android, you put images inside drawable folders on default. You can create drawables-{language code} suffix and add language-specific images and assets inside of it. In my case, I’ll create a drawable-es folder and add the same assets I have inside the default drawables. If you don’t have a corresponding assets on your language specific drawable folder, it will use the asset under the default drawables. Mine looks like this:

Application Name
For the application name, you will need to do the same thing with values. You need to create a values-{language code} suffix and create an XML file (Add > New File > Data > XML file) called Strings.xml under the drawable folder. Inside the Strings.XML, you need to create a string with an app_name key under the resource.


Now, in order for us to set the title of the application, we need to go to the MainActivity.cs and update the Activity attribute’s Label value to “@string/app_name” just like this:
[Activity(Label = "@string/app_name", Icon = "@drawable/icon", Theme = "@style/MainTheme", MainLauncher = true, ConfigurationChanges = ConfigChanges.ScreenSize | ConfigChanges.Orientation)]
iOS Project
With iOS, it’s kinda different since under Resources, we don’t have a drawable folder, so we’ll have to create our own folders. iOS has a naming standard called Localization Projects or .lproj directories that will not only contain the images but also the strings resources. Instead of adding a suffix for the specific language code, we’ll only name it using the language code itself. In my case, I have english and spanish as my two languages, so I’ll create en.lproj and es.proj for English and Spanish, respectively.
Images
This is how it should look like for your images:

Application Name
For the application name, you will need to create a .strings file called InfoPList.strings where you need to create a key value pair for the application name by adding “CFBundleDisplayName” = “[Type the display name here]”; for both localization projects.


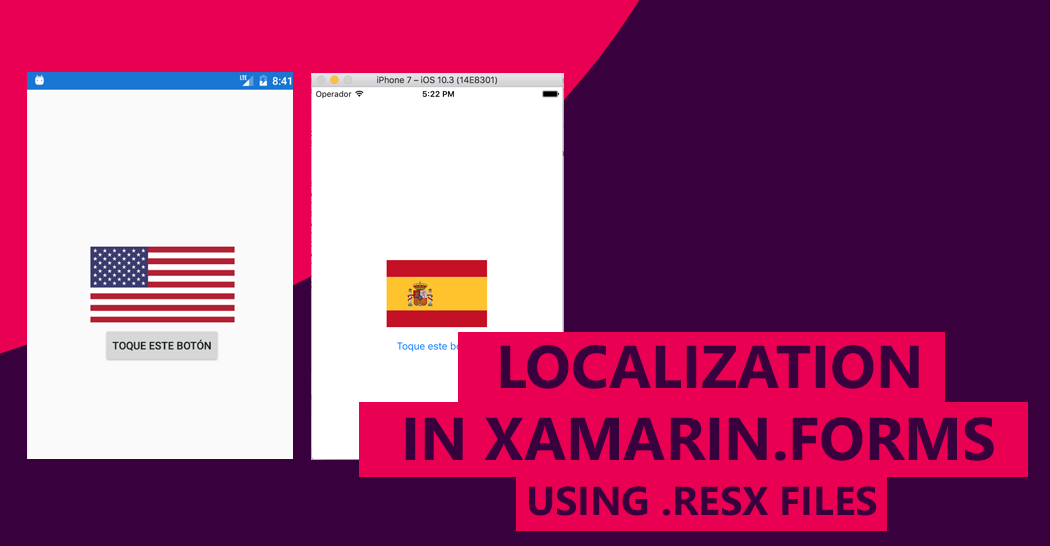
Now, we just need to add an image control that will use the flag.png in our XAML code:
<?xml version="1.0" encoding="utf-8" ?>
<ContentPage xmlns="http://xamarin.com/schemas/2014/forms"
             xmlns:x="http://schemas.microsoft.com/winfx/2009/xaml"
             xmlns:local="clr-namespace:LocalizationDemo"
             x:Class="LocalizationDemo.MainPage">
    <StackLayout
           VerticalOptions="Center"
           HorizontalOptions="Center">
        <Image Source="flag" HeightRequest="100"
           VerticalOptions="Center"
           HorizontalOptions="Center"/>
        <Button Text="{local:Translate TapThisButtonText}"
           VerticalOptions="Center"
           HorizontalOptions="Center" />
    </StackLayout>
</ContentPage>
If we run the app, this is how it looks like on Android and iOS:

And if look at the name of the application for platforms:

So, yeah, localization it’s as easy as that! If you want to try this out, I uploaded this project to github. Hopefully, this can get you started with implementing Localization in your application. Happy coding!